TOFFEE CHOCOLATE CHIP COOKIES

Since February, I’ve been on a quest to find a new favorite chocolate chip cookie recipe. After making my go-to recipe exclusively for years, which just so happens to be my pistachio chocolate chip cookie recipe sans the nuts, I felt like I needed to switch things up a bit. After scouring the internet for a basic recipe, I turned to my very small library of cookbooks here in Portland and found the winner within Baking at République.

Baking at République shares all the amazingly beautiful and decadent baked goods created by Margarita Manzke at the French restaurant République located in Los Angeles, CA. With a line outside the door just about every time you drive by it, Republique is deservedly famous not only for its stunning interior, but for the stellar lineup of pastries put on display in the front of the restaurant (they also serve lunch and dinner that is equally perfect). I am pretty picky when it comes to buying cookbooks especially since you can find just about any recipe on the internet these days, but trust me when I say that the République cookbook is worth it.

The chocolate chip cookie recipe from Baking at République is as straight-forward as it gets: there are only 8 ingredients, no browning of butters and no crazy ingredients added. The only thing that caught me off guard as I was reading through the recipe was the fact that there’s no vanilla extract (!!!) used. I actually thought my book had a misprint to the point that I cross-checked by finding the recipe on another random blog, but sure enough, my book’s recipe was actually correct. As any baker knows, the addition of vanilla extract is similar to adding salt to a recipe: it enhances the flavor of all the other ingredients in the recipe and essentially gives life to whatever dish it’s in. Without it, I was worried that the cookies would taste flat or bland, but to my surprise, I didn’t even notice it was missing when eating the cookies! The only thing I did notice was that the cookie dough didn’t smell as enticing as it normally would with vanilla in it (I seriously could smell cookie dough all day, every day), but that just meant it smelled more buttery, which isn’t necessarily a bad thing. I’m not really sure why République chooses to leave the extract out - could be for cost purposes since we all know how expensive the stuff is - but after eating the cookies, I'm okay with their decision.

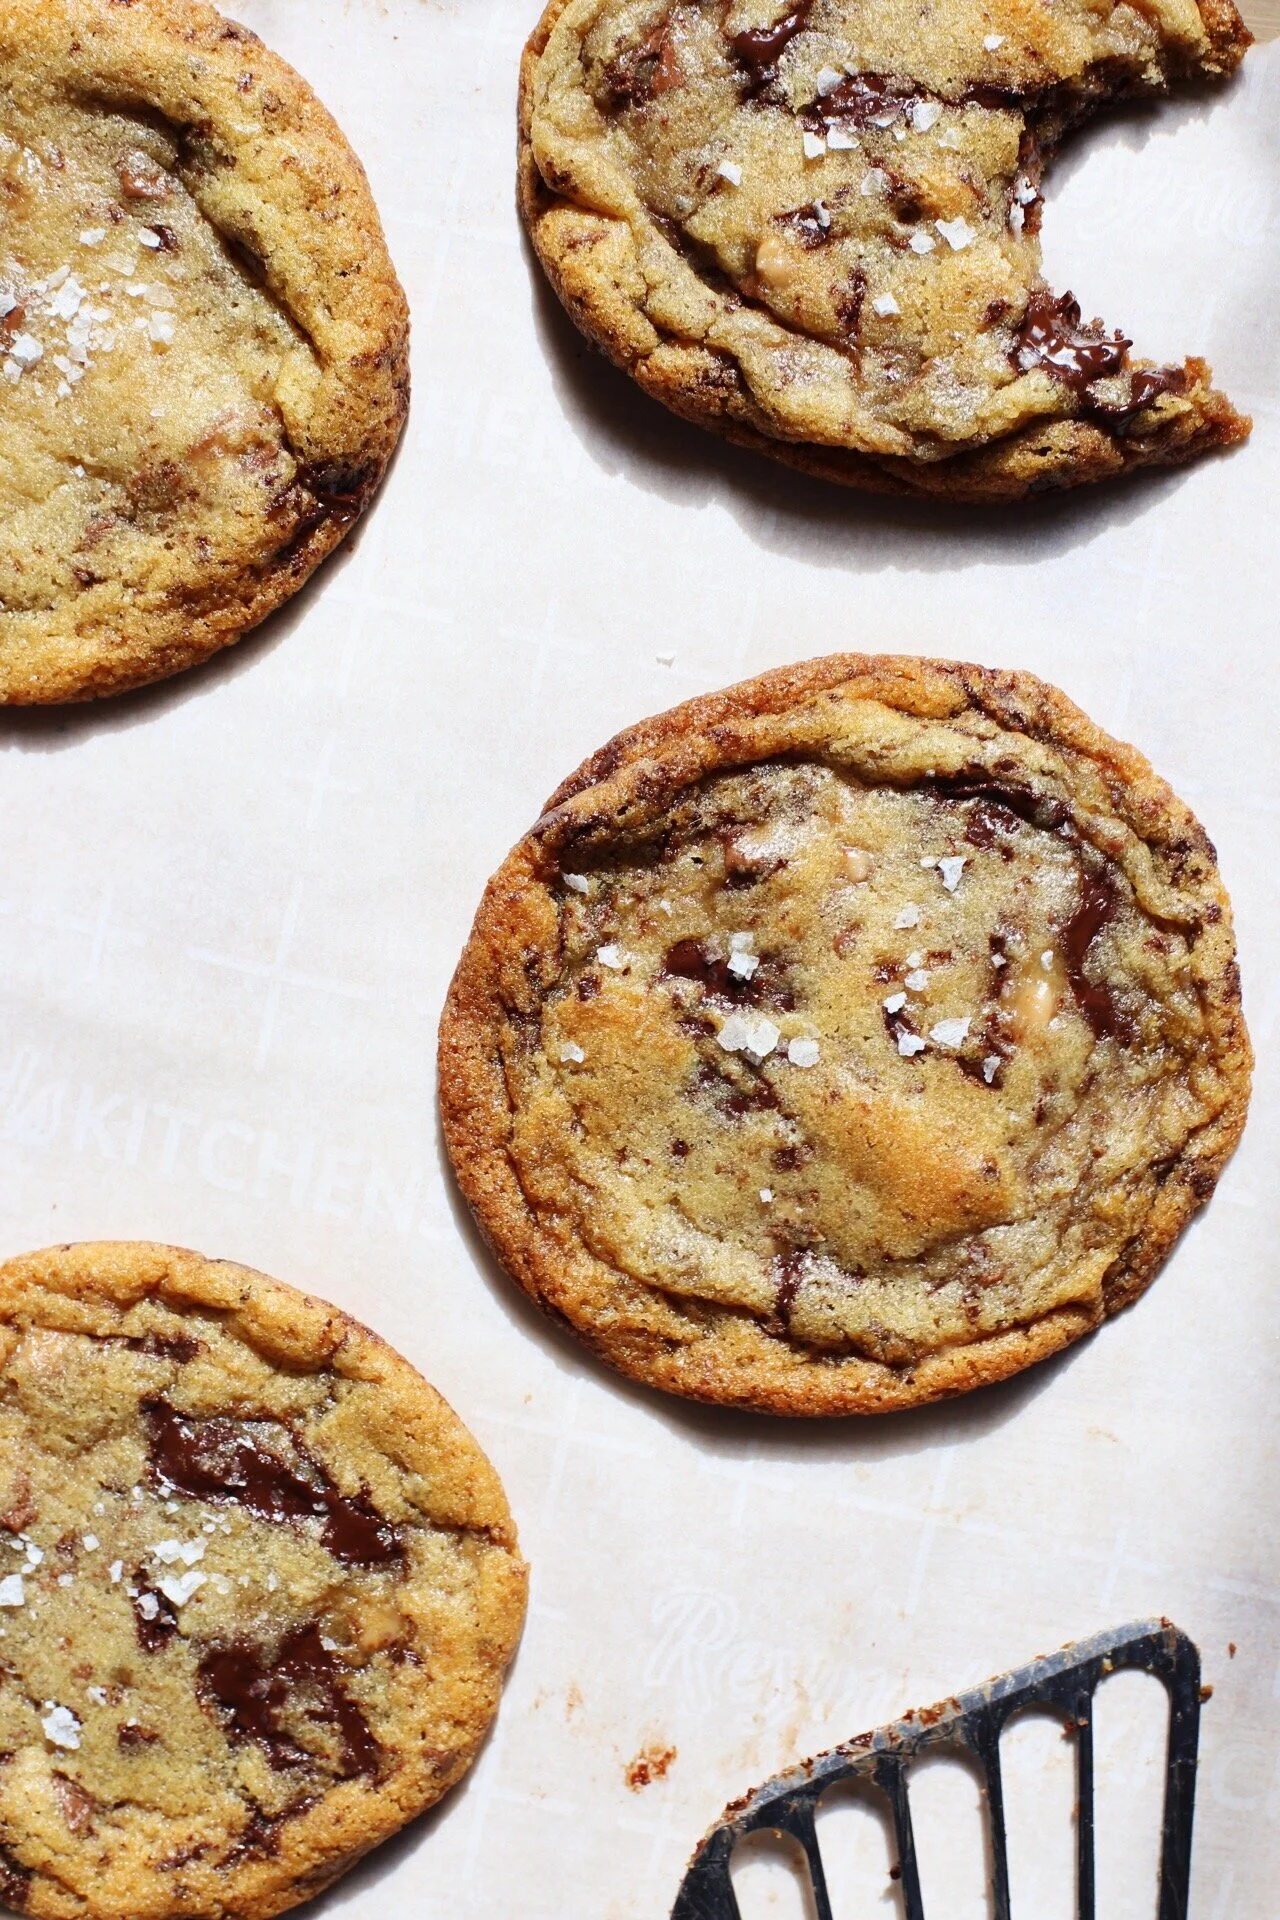
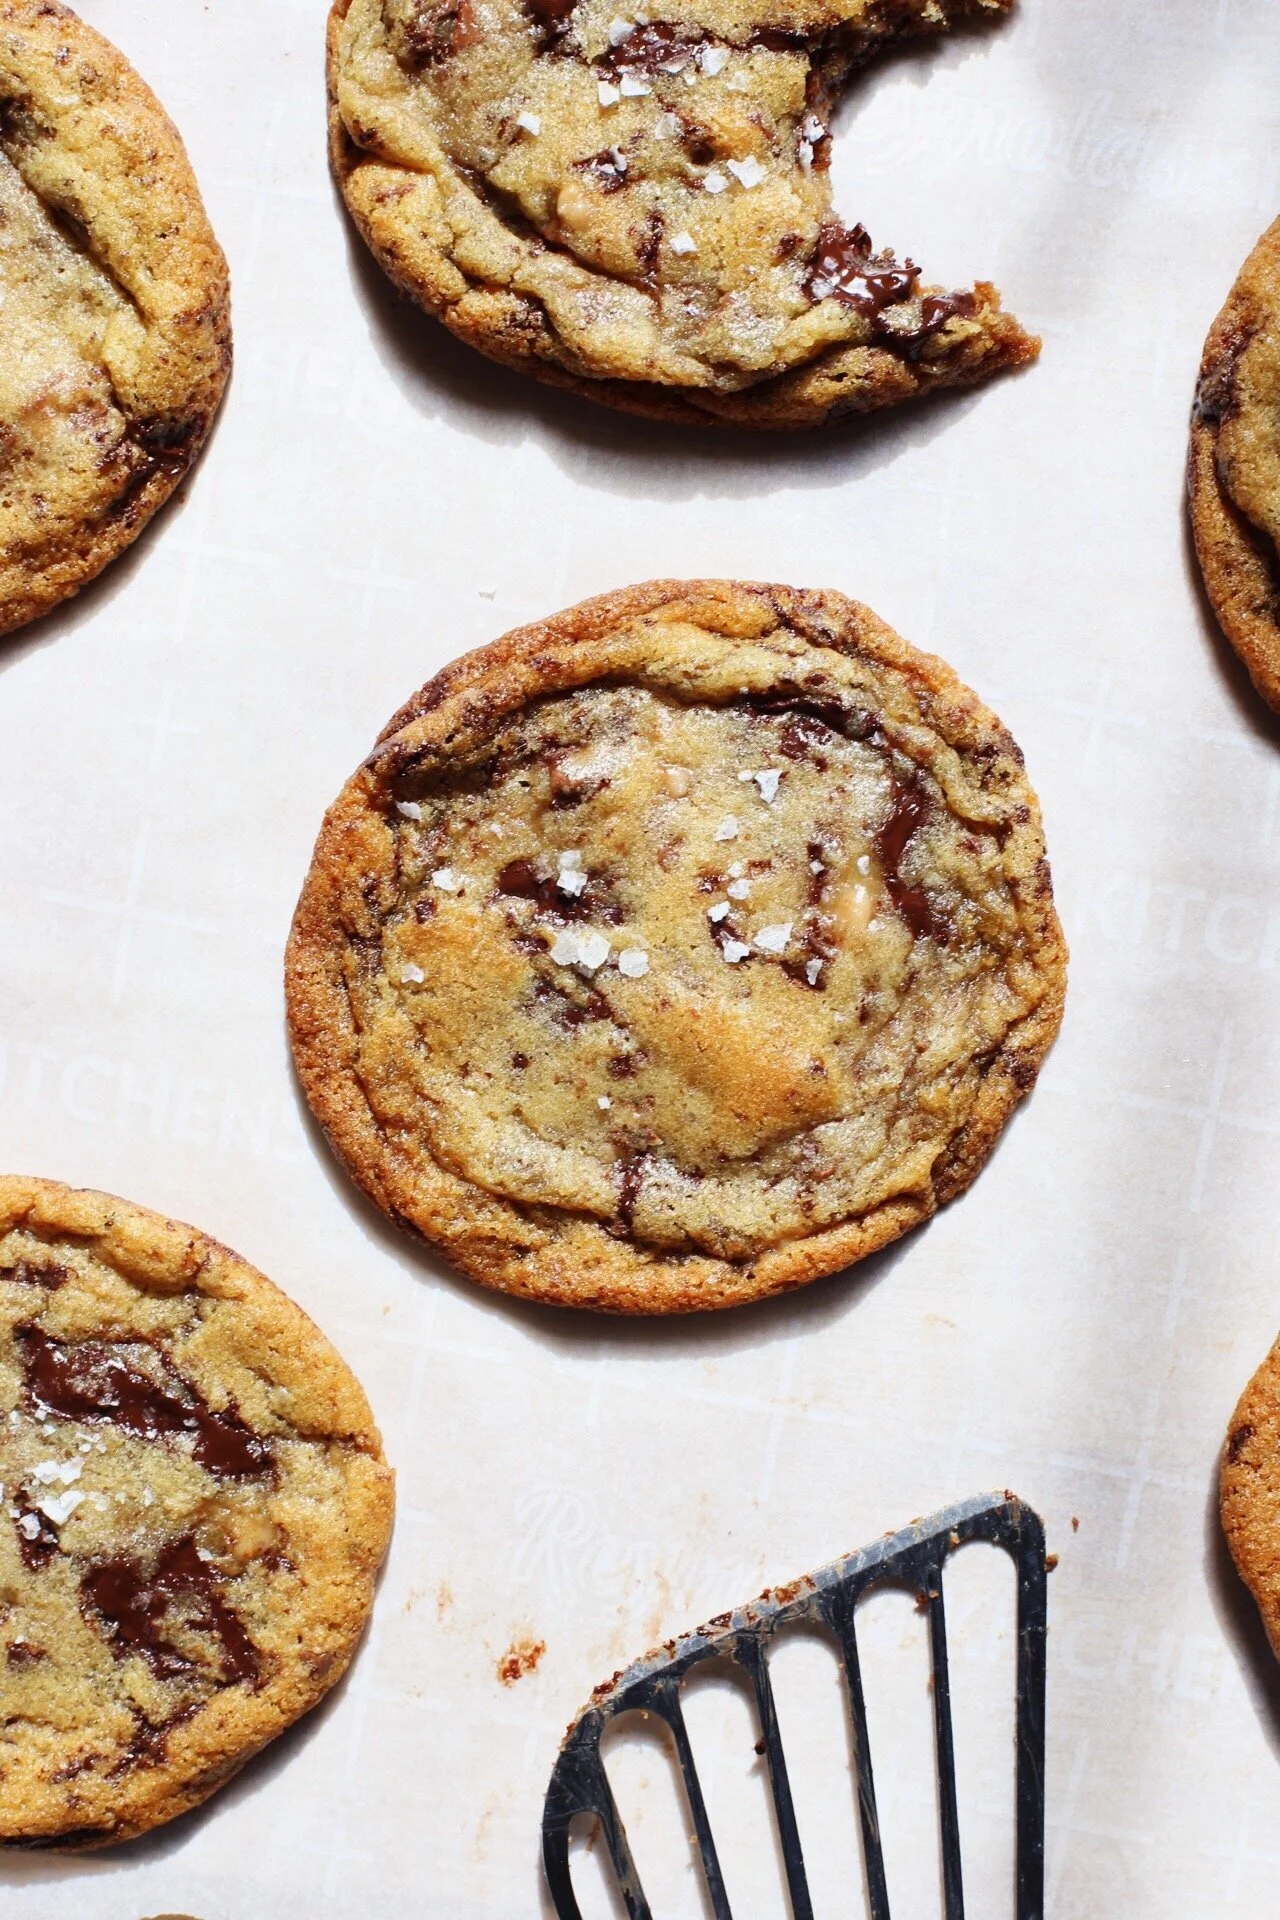
As I’m sure you noticed in the title of this recipe, these cookies have toffee in them and that’s because of a happy accident that occurred the first time I baked them. République’s recipe for these cookies calls for about 1 cup of chopped dark chocolate and at the time, I only had about half of that in my fridge. Determined to get the full amount of chocolate to dough ratio that was needed, I decided to add in chopped up Heath bars that I had leftover from making my coffee toffee ice cream. This turned out to be the best decision I could ever make and is what I think makes these perfect cookies that much better. Adding Heath or Skor candy bars to any dessert is kind of like cheating because you’re not only getting more chocolate (in this case, milk chocolate) but you’re getting the addicting caramel-y flavor of toffee that melts in your mouth. I know I said I wanted to find a new basic chocolate chip cookie recipe, but it’s 2021… we can add something a little interesting (even if it’s straight-up candy bars) to our cookies these days. If you want to make these cookies as just a normal chocolate chip cookie, simply leave out the toffee and add only the chocolate, but I promise you that the toffee candy doesn’t make it “too much” or overly decadent… the toffee is almost like a secret ingredient that elevates it. But as always, you do you.

The last thing I wanted to comment on is that I also shared the weight measurements for this recipe, something that I rarely do. As an American, baking with a scale isn’t the norm but I’ve been trying to get into the habit of doing it more often, especially since it requires less time in making the dough and less time cleaning up after.

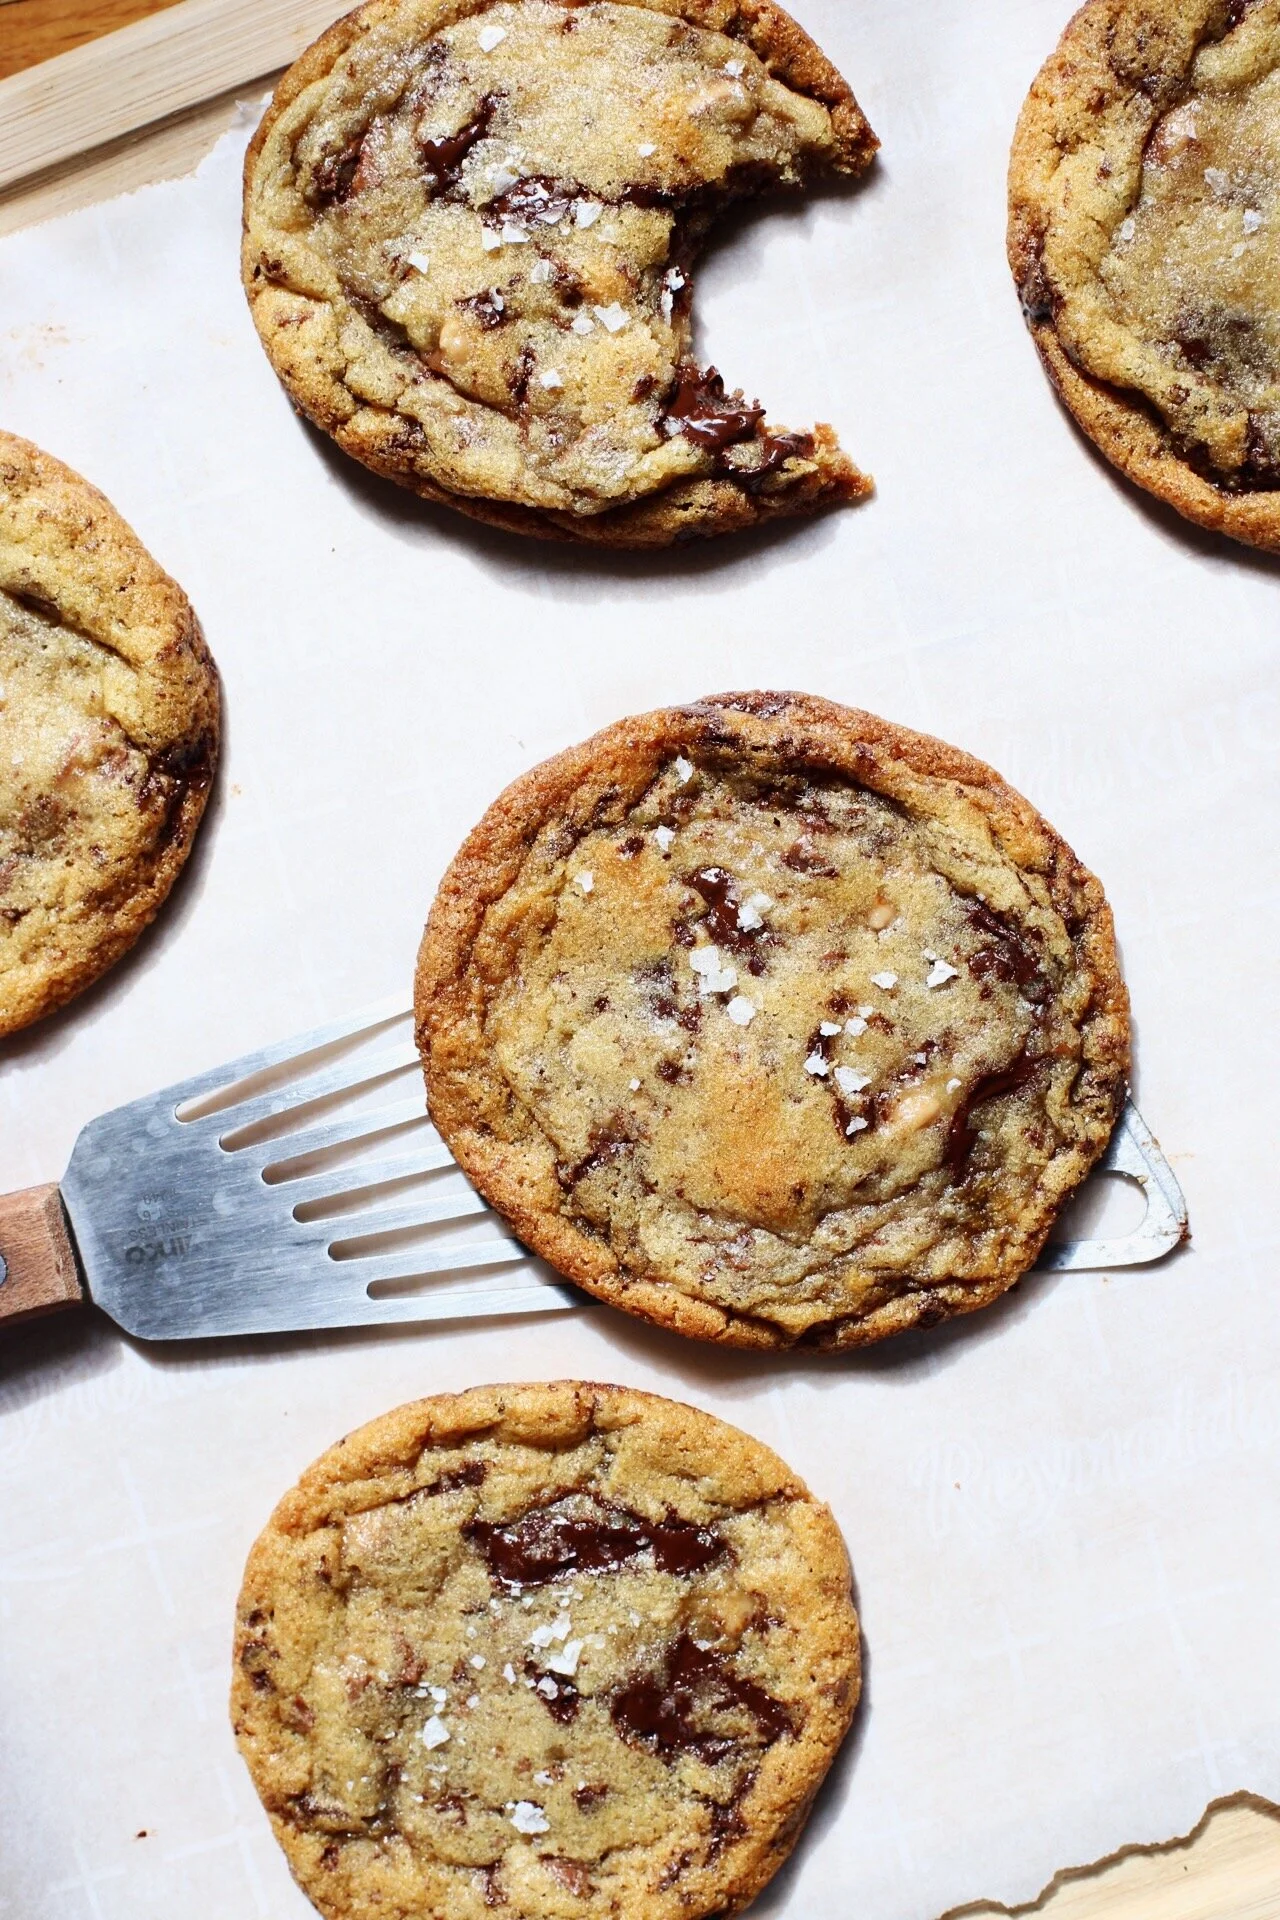
Toffee Chocolate Chip Cookies

Yields a dozen large cookies

Recipe adapted from the Baking at République Cookbook

Ingredients

  • 1 1/3 cups plus 1 tbsp. (175g) all-purpose flour

  • 3/4 tsp. (5g) baking soda

  • 1/4 tsp. kosher salt

  • 1/2 cup (113g) unsalted butter, slightly softened but still cold (should leave an indentation when poked)

  • 3/4 cup plus 1 tbsp. (130g) packed light brown sugar

  • 1/2 cup (100g) granulated sugar

  • 1 large egg

  • 1 cup plus 2 tbsp. (150g) mix of chopped dark chocolate AND chopped chocolate-covered toffee candy (Heath or Skor works) - I do equal parts of both

  • Flaky sea salt, to finish

Directions

  1. In a medium-sized bowl, sift the flour, baking soda and salt together. Whisk until combined and set aside.

  2. Using a stand mixer fitted with the paddle attachment (or in a large bowl if using a hand mixer) cream the butter and both sugars together until incorporated, about 1-2 minutes. Try not to over mix, or the cookies will flatten more while baking. Add the egg and mix again.

  3. Add the dry ingredients to the stand mixer bowl all at once and turn the mixer on low for 10 seconds before increasing the speed to medium for about 30 seconds, or until the dough comes together. Again, try not to over mix the dough. Using a spatula, fold in the chopped chocolate and toffee pieces.

  4. Using a large cookie scoop or spoons, portion out 2oz. or 3 tablespoons of dough for each cookie (you should get 12 cookies), place them on a plate and cover with plastic wrap. Refrigerate the cookie dough overnight / at least 12 hours.

  5. Preheat the oven to 350°F* and cover a baking sheet with parchment paper.

  6. Bake the cookies for 8-11 minutes or until the edges are golden brown (bake only 4 cookies at a time to ensure the cookies will have enough room to spread). Sprinkle flaky sea salt immediately after pulling them out of the oven.

  7. Allow the cookies to sit on the baking sheet for a few minutes before transferring to a cooking rack. Store in an airtight container. Enjoy!

* I’ve made these cookies a few times with the oven temperature at 375°F purposefully and accidentally (my oven isn’t the best) and they still came out amazingly. You’ll end up with a slightly crispier exterior and a deeper color, but it’s not too drastically different. So if you want a cookie like that, bake at 375° and knock a minute of two off the baking time!

LEMON CURD RICOTTA THUMBPRINT COOKIES

IMG_5886.jpeg

No, those are not deviled eggs that you are seeing in the pictures before you; they are soft and delicate ricotta cookies that are slightly spiced and topped off with a silky and perfectly tart lemon curd. I know I always say this, but these little bites of perfection are my favorite dessert at the moment and I couldn’t be happier with how they came out.

With exactly a dozen cookie recipes on my blog so far, I found it quite surprising that I hadn’t yet included a single recipe for a thumbprint cookie - you know, the ones that have a slight “crater” or indentation on the top that is filled with jams or preserves, with raspberry being the most popular flavor. They’ve been around since the 1800s and apparently were invented in Sweden, but were also popular in Poland and other Eastern European countries. I grew up eating a similar version of them because my Czech grandma would bake them all the time and it’s a dessert of hers that I seriously miss.

IMG_5730.jpeg

The thumbprint cookie recipe that I’m sharing with you today isn’t exactly the standard way to make them but one that is kind of a hybrid with another traditional cookie: Italian ricotta cookies. It’s no secret that I adore dishes that have ricotta in them (whether used in ice creams, cakes, or pancakes), so I wanted to make a thumbprint cookie using the ricotta cookies as a base, and then further driving home the Italian influence by using lemon curd to fill the indentation instead of a fruity jam. It’s the best of both worlds and I find them to be insanely addicting, especially since they’re so small in size.

For the ricotta cheese, you can either go the route of making it yourself, which I actually have a recipe for here, or you can buy a tub of it at your local grocery store to make your life a little bit easier. Just make sure to buy whole milk ricotta and not the part-skim variety. The cookie base also has a couple of spices, cardamom and cinnamon, added to make for a more interesting flavor but feel free to play around with different spices like ginger and nutmeg. I also added a couple teaspoons of lemon zest to the dough to just give a bit more lemon flavor in addition to the lemon curd on top.

IMG_5884.jpeg

As for the lemon curd, I’ve found the easiest and most straightforward recipe via Epicurious: it doesn’t require you to use a food processor or a double-boiler like a lot of other recipes do, and you technically don’t even need to use a kitchen thermometer (fruit curds need to reach a temperature of 170°F in order to properly set), but I’ve made this recipe multiple times both with and without a thermometer, and had the exact same results each time. If you’re worried that you may have curdled the eggs, all you have to do is strain the mixture after taking it off the heat. The recipe will yield about 1 1/3 cups which will be more than enough needed for the cookies, so feel free to use up the rest by slathering it on pancakes, waffles, scones or as a filling in a layer cake.

Also, if you want to switch things up, you can absolutely make a different flavored curd, like blood orange, passion fruit or grapefruit. I recently made a blood orange curd and was almost going to use it for this recipe but honestly, it wasn’t the most appealing color. In my opinion, nothing beats the color and flavor of lemon curd but definitely use whatever fruits speak to you.

Note: if you plan on making the curd yourself, make it the day before baking the cookies so that the curd will be properly chilled.

IMG_5837.jpeg

Lemon Curd Ricotta Thumbprint Cookies

Yields about 4 dozen cookies

Recipe adapted from Food52

Ingredients

IMG_5913.jpeg
  • 2 cups all-purpose flour

  • 1/2 tsp. ground cardamom

  • 1/4 tsp. ground cinnamon

  • 1 tbsp. baking powder

  • 1/2 tsp. kosher salt

  • 1/2 cup (4 oz.) unsalted butter, room temperature

  • 1 cup granulated sugar

  • 6 oz. (about 2/3 cup) whole milk ricotta cheese, room temperature (homemade or store bought)

  • 1 large egg, room temperature

  • 1 tsp. vanilla extract

  • 2 tsp. lemon zest

  • 1/2 to 3/4 cup lemon curd, homemade (recipe below) or store bought

  • Chopped pistachios and/or confectioners’ sugar, to finish

Directions

  1. In a medium-sized bowl, whisk together the flour, cardamom, cinnamon, baking powder and salt. Set aside.

  2. Using a stand mixer fitted with the paddle attachment (or in a large bowl if using a hand mixer) cream the butter and sugar together until light and fluffy, about 2-3 minutes on medium speed. Add in the ricotta cheese and mix again until well incorporated. Scrape down the sides of the bowl and add the egg, vanilla extract and lemon zest. Mix until well combined.

  3. With the mixer off, add in the dry ingredients all at once and mix on low for about 10 seconds before increasing the speed to medium for about 30 seconds, or until the dough comes together - try not to over mix the dough. Cover the bowl with plastic wrap and refrigerate the dough for at least an hour..

  4. Preheat the oven to 350°F and line a baking sheet with parchment paper.

  5. Scoop out about 1 tablespoon portions of dough and roll into a ball using your hands - it will be messy but not too difficult if the dough is properly chilled. Bake 12 cookies at a time for 12-14 minutes, rotating the pan halfway through. The cookies will be done when they’re golden brown on the bottom and when the cookie springs back when gently poked with your finger.

  6. Allow the cookies to cool for about 30 seconds on the baking sheet, and then, using the back of a teaspoon, press down on each cookie for about 5 seconds in order to create an indentation for the lemon curd. After a couple of minutes, transfer the cookies to a cooling rack and fill each indentation with about 3/4 to 1 tsp. of lemon curd.

  7. Finish each cookie with chopped pistachios and/or a good dusting of confectioners’ sugar. Store the cookies in an airtight container at room temperature or in the fridge. Enjoy!

Lemon Curd

Yields about 1 1/3 cups

Recipe slightly adapted from Epicurious

Ingredients

  • 1/2 cup fresh lemon juice, strained if pulpy

  • 1 tbsp. finely grated lemon zest

  • 3 large eggs

  • 1/2 cup granulated sugar

  • Pinch of salt

  • 3 oz. (6 tbsp.) unsalted butter, cut into small pieces

Directions

  1. To a small/medium saucepan, add the lemon juice and zest, eggs, sugar and salt and turn the heat on the stovetop to medium-low. Immediately begin to whisk the mixture together in order to temper the eggs - the more frequently you whisk, the less of a chance you’ll have of curdling the eggs.

  2. After about a minute of whisking, start to slowly add in the small pieces of butter to the saucepan - I add the butter in about 4 batches, allowing the butter to melt before adding in more. Continue to whisk like crazy, and after about 5 minutes, the mixture will begin to thicken. If using a thermometer, you want the curd to reach 170°F. If not using a thermometer, the curd will be done when the mixture is beginning to bubble (don’t allow it to boil or the eggs will curdle).

  3. Immediately strain the curd through a sieve into a small bowl, cover it with plastic wrap (have the plastic touching the top of the curd) and refrigerate for about an hour. Store the curd in an airtight container like a mason jar and keep in the fridge.

    *For the above cookie recipe, you would want to have the curd chilled before using it, so I would suggest making the curd a day before baking the cookies.

GRAPEFRUIT POPPY SEED YOGURT CAKE

IMG_4895.jpeg

Oh hey, 2021! Since my last post, which was over a month ago, some exciting events have taken place in my life. To start, I celebrated my 31st birthday at the end of December and although that probably doesn’t sound all that thrilling to anyone, I’m a huge proponent of celebrating anything and everything, especially during a pandemic. The day featured my favorite things: breakfast pastries, a beach hike, Mexican food and good cocktails. Secondly, and much more importantly, I got engaged! On a very normal Thursday, Alex and I went for a walk around our beautiful neighborhood here in Portland, and before I knew it, Alex was down on his knee asking me to spend the rest of our lives together. It was very low-key, very intimate and exactly how I would have wanted it. I’m beyond happy.

IMG_4658.jpeg

With February just around the corner, I’m glad that we’re almost out of the “healthy phase” of the year, where people give up things like dairy, alcohol or carbs… only to go straight back to it the moment January ends. I’m a huge believer in balance and try not to restrict myself when it comes to food, so I definitely don’t partake in anything like that. but to each their own. With Valentine’s Day quickly approaching, I wanted to give a simple cake recipe that you could whip up for yourself, a loved one, friends or even coworkers (for those not working from home at the moment). Today’s Grapefruit Poppyseed Yogurt Cake doesn’t scream Valentine’s Day like chocolate does, but I think it’s something that can definitely be enjoyed on the holiday for breakfast or dessert, as well as any other day of the year.

In previous posts, I’ve made it abundantly clear that I love citrus season, which we’re in the thick of right now. I always take full advantage of the season whether I’m snacking on tangerines, juicing Cara Cara oranges to drink with breakfast, or making tons of salads with fresh lemon juice as part of the dressing. Grapefruit will always be a favorite fruit of mine and when it comes to desserts, I think they add a little something more special than a typical lemon or orange. Side note: Did you guys know that eating grapefruit while on certain medications can prevent the medicine from being effective?! Alex informed me of this last week while I was working on this recipe, and I honestly had no idea. Google it!

IMG_4718.jpeg

Alright, back to the cake. I added poppy seeds to not only give the cake a nice look, but of course for the added texture. Usually, we’re familiar with lemon poppy seed recipes (like my Lemon Poppy Seed Buttermilk Waffles) so I thought it’d be a nice change to see the seeds paired with a different citrus. This cake also has Greek yogurt, brown sugar, and vegetable oil: all things that will lead to a beautifully moist and flavorful cake. If you’re not a Greek yogurt fan, you can definitely use plain yogurt as a substitute; all I ask is that you stay away from the flavored varieties with added sugars and whatnot. Additionally, you can use full or nonfat yogurt… I tend to always have nonfat Greek yogurt in my fridge for breakfast, but I sometimes have the whole fat variety for when I plan on making tzatziki. Use what you got! If you’re in a pinch, even sour cream could work.

Lastly, the cake is finished with a very simple glaze - confectioners’ sugar mixed with grapefruit juice - but if you’re aiming for this to be more of a breakfast item, maybe think about skipping it? Or don’t, and savor the extra sweetness with a cup of coffee and enjoy your life.

P.S. For a similar cake, you can also try my Blackberry + Hazelnut Yogurt Cake, which has honey as an added sweetener.

IMG_4810.jpeg

Grapefruit Poppy Seed Yogurt Cake

Makes (1) 9x5 loaf cake

Recipe adapted from Sally’s Baking Addiction

Ingredients

For the cake:

IMG_4801.jpeg
  • 1 1/2 cups all-purpose flour

  • 1 1/2 tbsp. poppy seeds

  • 2 tbsp. grapefruit zest

  • 1 1/2 tsp. baking powder

  • 1/2 tsp. kosher salt

  • 3/4 tsp. ground cardamom, optional

  • 3 large eggs

  • 1 cup light brown sugar, packed

  • 3/4 cup plain Greek or regular yogurt, preferably whole milk, but nonfat works

  • 1/4 cup freshly squeezed grapefruit juice

  • 1/3 cup vegetable oil

  • 1/2 tsp. vanilla extract

For the glaze:

  • 1 cup confectioners’ sugar, sifted if lumpy

  • 2 to 2 1/2 tbsp. freshly squeezed grapefruit juice

Directions

Make the cake:

  1. Preheat the oven to 350°F and grease a 9x5 loaf cake pan with either butter or cooking spray. Set aside.

  2. In a large bowl, whisk the flour, poppy seeds, grapefruit zest, baking powder, salt and cardamom (if using) together until combined.

  3. In a medium bowl, whisk the eggs together and then add all the other cake ingredients - brown sugar, yogurt, grapefruit juice, vegetable oil and vanilla extract - and whisk until thoroughly combined,

  4. Add the wet ingredients to the dry ingredients and whisk until just incorporated, avoiding over-mixing. Pour the batter into the prepared loaf pan and bake until a toothpick inserted in the center of the cake comes out clean, about 45-50 minutes. Allow the cake to cool in the pan for about 20 minutes before removing and cooling completely on a cooling rack.

Make the glaze:

  1. Once the cake is cooled, whisk the confectioners’ sugar and 2 tbsp. of the grapefruit juice. If the glaze is too thick, add more of the juice, 1/2 teaspoon at a time, until desired consistency is reached. Drizzle the glaze all over the top of the cake. Enjoy!