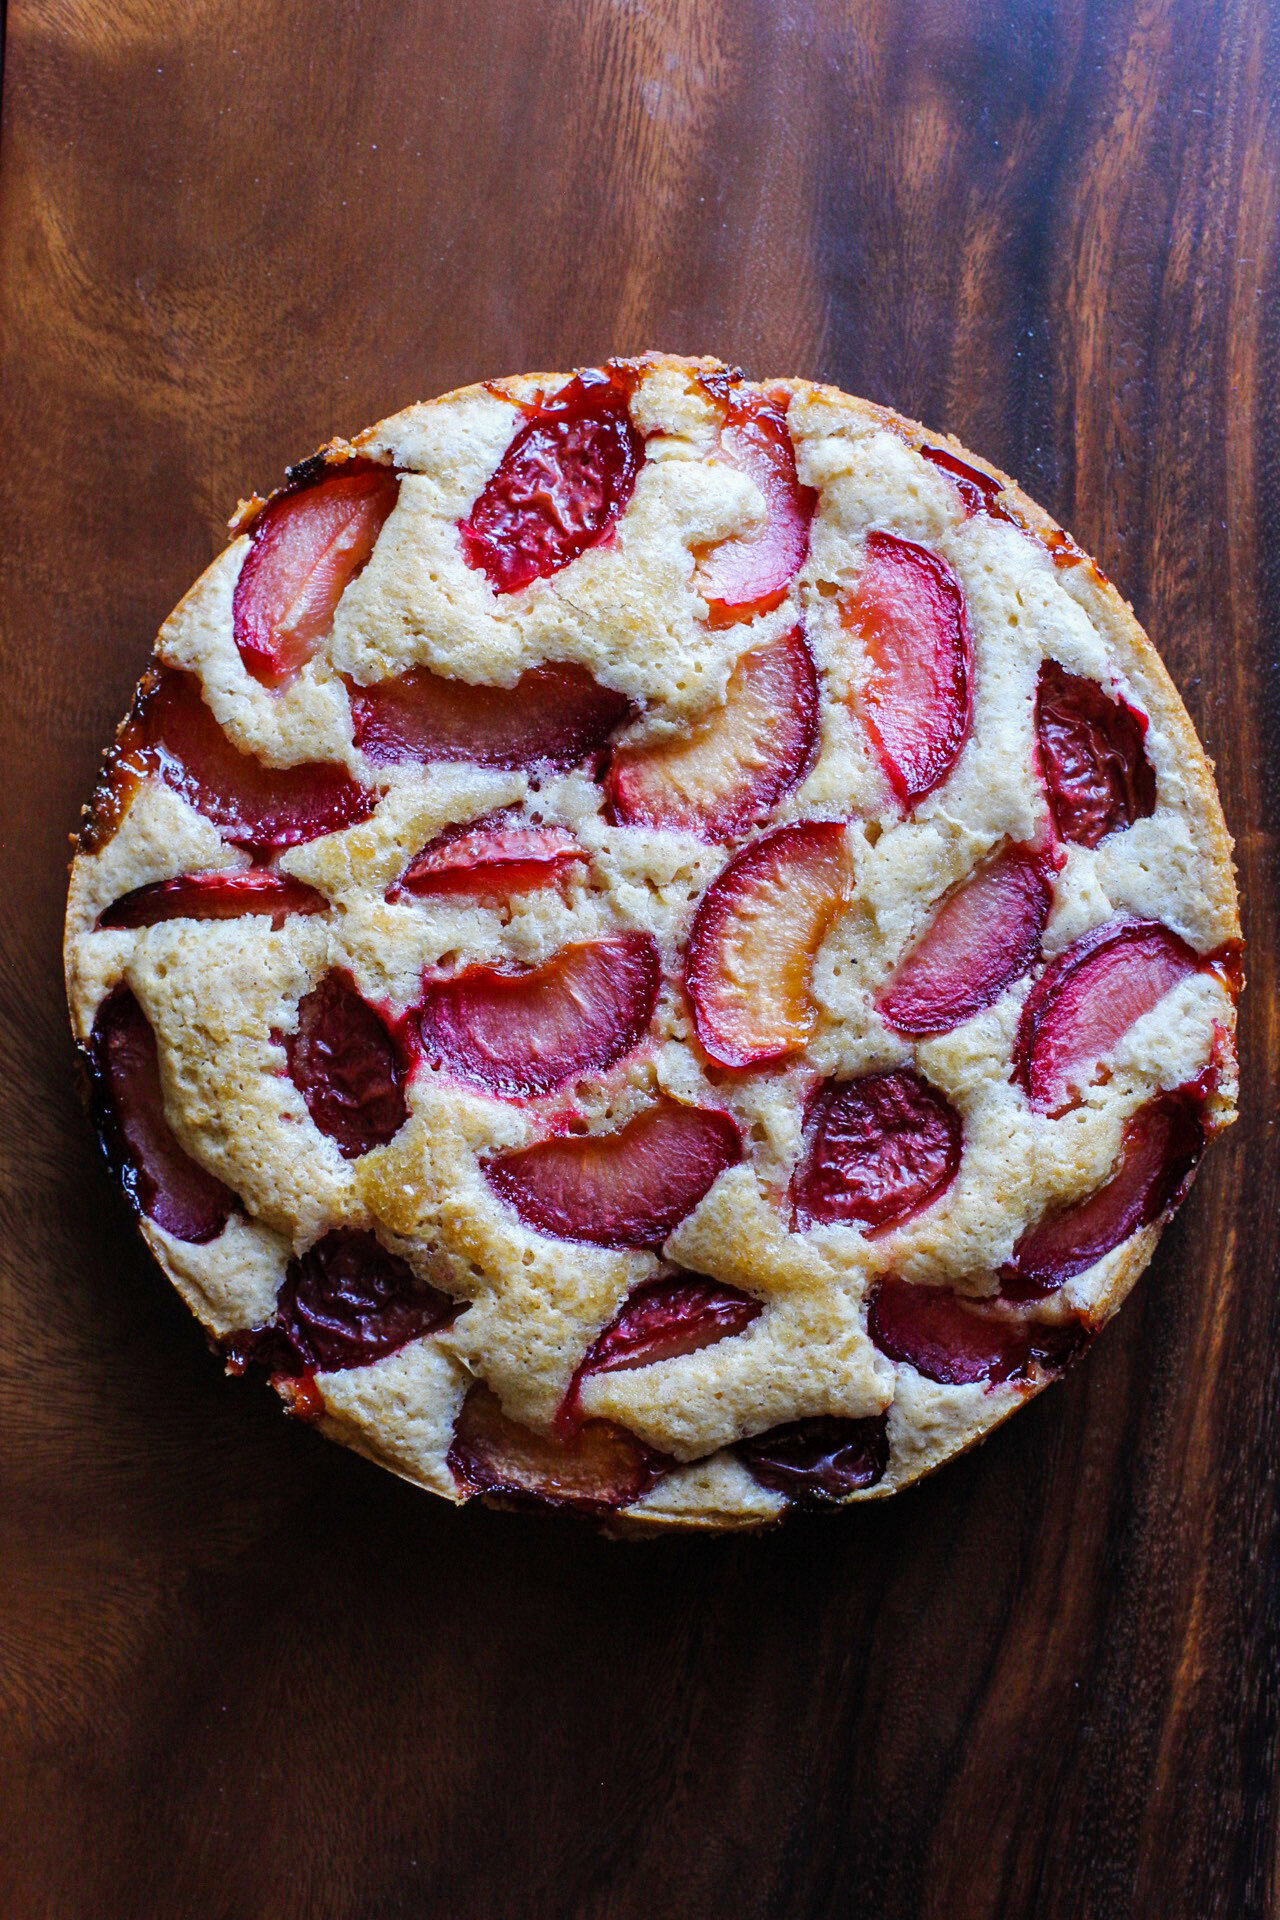
SIMPLE SUMMER PLUM CAKE

IMG_3213.jpeg

Today's recipe has quite a bit of significance to me. Back in 2011, when I was in college in Chicago and only occasionally baking cupcakes and cakes from a box mix, and absolutely nothing from scratch, I discovered food blogs. I believe this was the time when food blogs, and any type of blog for that matter, were beginning to gain traction and it felt as if there was a new blog popping up on the internet daily. One of those blogs was Smitten Kitchen - a blog that is run by Deb Perelman that I still love and utilize to this day.

IMG_3081.jpeg

I randomly came across a recipe of Deb's, Strawberry Summer Cake, in the summer of 2011 when I was visiting Cleveland, Ohio and wanted to make something for the Fourth of July. The recipe looked innocent enough and I thought I'd give it a try, this being my first recipe baking from scratch without help from my mom, grandma, etc. Also, the house I was staying at had a beautiful, hunter green Kitchenaid stand mixer, and I was fortunately able to use it (this was also my first time using the machine). Needless to say, I made a bunch of mistakes while making the cake - I'm fairly certain I didn't use room temperature butter and got some eggshell in the batter that I had to fish out - BUT by some miracle, the cake ended up working out and tasted pretty good. 

Even though I didn't really get into baking until I moved back home to California a year later, I'll never forget that day in Cleveland and how it sparked something within me; I will always fondly think of that as my "first" baking experience.

IMG_3103.jpeg

7 years later, I like to think that a lot has changed when it comes to making a simple fruit cake, and more over, my skills in the kitchen. But for whatever reason, I never attempted to remake that strawberry cake until this past weekend when it somehow popped up on my radar again. But even though the cake calls for strawberries, I thought I'd take this recipe and use it as a base for something that I wanted to create. So, I went grocery shopping and looked for a fruit substitute that is in season right now - lo and behold, I landed on plums. 

Honestly, I can't tell you the last time I had eaten a red plum and I'm kind of kicking myself for not doing it sooner. I've always been more inclined to buying nectarines or peaches, but I gotta say that plums might be beating both of those right now. They are that good. And look at how beautiful they are! 

IMG_3119.jpeg

Luckily for me, the plums worked out perfectly with the cake. To put my own spin on it, I added some spices that I knew would work well with the fruit (AKA I googled what pairs well with plums). I added cinnamon, ginger, and a little bit of cardamom because it's what I had in my pantry and it turned out AMAZING. If ginger isn't your thing, you definitely can leave it out and just add more nutmeg or even add another spice in its place, like cardamom. 

I feel like this cake can easily pass as a breakfast dish; I would just maybe stay away from adding confectioners' sugar and whipped cream, and maybe topping it with greek yogurt instead with fresh plums. That sounds perfect to me!

IMG_3175.jpeg


Simple Summer Plum Cake

Makes (1) 9" or 10" Cake

Recipe adapted from Smitten Kitchen

Ingredients

IMG_3193.jpeg
  • 6 tbsp. unsalted butter, room temperature, plus more for pan

  • 1 1/2 cups (188g) all-purpose flour

  • 1 1/2 tsp. baking powder

  • 1/2 tsp. salt

  • 1 tsp. ground cinnamon

  • 3/4 tsp. ground ginger

  • 1/4 tsp. ground cardamom

  • 1 cup granulated sugar

  • 1 large egg, room temperature

  • 1 tsp. vanilla extract

  • 1/2 cup milk (any kind will work, including non-dairy - I used unsweetened almond milk)

  • 1 pound plums (about 4) halved, pitted, and cut into about 8 wedges per plum

  • 2 tbsp. turbinado sugar

  • Confectioners' sugar, whipped cream, and/or thinly sliced fresh plums, to finish

Directions

  1. Preheat oven to 350°F. Generously butter a 9-inch or 10-inch springform pan (or pie pan).

  2. Whisk together the flour, baking powder, salt, cinnamon, ginger, and cardamom in a medium bowl and set aside.

  3. In the bowl of a stand mixer fitted with the paddle attachment (or in a large bowl if using a hand mixer) cream the butter and sugar together, on medium speed, until light and fluffy, about 3 minutes. Add the egg, vanilla extract, and milk and mix until incorporated. Scrape down the side of the bowl.

  4. With the stand mixer on low speed, gradually add the flour mixture until smooth. The batter will be quite thick.

  5. Evenly spread the batter into prepared pan. Arrange the plums in a single layer over the batter with the skin side up. Sprinkle the two tablespoons of turbinado sugar over the top.

  6. Bake in the oven for 10 minutes, then lower the temperature to 325 degrees F and bake for another 50-60 minutes until the cake is golden brown and a toothpick inserted in the middle of the cake comes out clean.

  7. If using a springform pan, allow the cake to cool 10-20 minutes before running a knife around the edge of the pan and carefully remove the top. Allow the cake to cool completely on a rack before adding your topping of choice (confectioners' sugar, whipped cream, and/or thinly sliced fresh plums).

CHOCOLATE CHUNK AND ORANGE POUND CAKE

public.jpeg

Since starting this blog about six weeks ago, I've been using it as an excuse to buy new kitchen/bakeware products that I've always wanted. This includes some new cake plates, a bundt cake pan, a set of offset spatulas to help with frosting cakes, etc. etc. Furthermore, with me being in charge of the desserts at my sister's upcoming wedding, I've been taking it as an opportunity to trade in my hand-me-down mismatched cake pans and upgrading to a set that hopefully will allow me to bake level and identical cake layers. 

One product that I recently purchased was a digital kitchen scale. Any good baker knows that weighing ingredients in either grams or ounces is the most efficient and accurate way when baking. But being in America where we don't use the metric system and measure our ingredients not by weight but rather by volume, we've just become accustomed to not using a scale. 

public.jpeg

The kitchen scale not only helps with the obvious aspect of properly measuring out ingredients - with flour at the forefront of ingredients that most bakers do not successfully measure out when using cups - but it also helps with dividing up batter for layered cakes. When I found out I would be baking my sister's wedding cake I decided to buy a kitchen scale. In the past, I would always eyeball the batter when dividing it between cake pans, mostly because I was just making a simple birthday cake and it wasn't that important to be identical, but the layers absolutely need to be perfect for a wedding cake.  

public.jpeg

This brings me to this very, very good pound cake. This past weekend I was scrolling through saved recipes on my computer when I came across this one. I love a simple pound cake and I especially love one that can be customized to whichever flavors you decide to choose that day. When I noticed that two of the ingredients (flour and sour cream) were given in ounces and not cups, I knew I had to test out my kitchen scale. The results were perfect, and I am going to safely say that I believe it is due to the scale... I read through the 60 or so comments on the recipe and it seems that those who didn't use the scale ended up having trouble with the recipe (or just had trouble in general).

public.jpeg

With that said, if you do not own a scale, I would suggest being very careful when measuring out your flour and sour cream - do not forget to properly spoon and level when measuring. But if you have no desire to go out and buy a scale, I provide measurements for both ingredients in cups. 

Also, if you aren't a huge fan of the combination of orange and chocolate, have no fear, you can take each of these ingredients out and either just have a plain pound cake (with whipped cream and strawberries) or you can substitute with nuts, dried cranberries, fresh berries, etc. You're the one baking here so you have the power to add whatever you want to it!

public.jpeg

Chocolate Chunk and Orange Pound Cake

Makes 1 bundt cake or 2 (9x5) loaves

Recipe adapted from Jodi Rhoden via Food52

Ingredients 

public.jpeg
  • Cooking spray or butter (for the pan)

  • 3 cups sugar (plus more for the pan)

  • Zest of 3 large oranges

  • 14.4 oz. (2 3/4 cups plus 2 tbsp.) all-purpose flour, sifted

  • 1 tsp. baking soda

  • 1 tsp. salt

  • 8 oz. (2 sticks) unsalted butter, room temperature

  • 6 large eggs, room temperature

  • 10 oz. (1 1/4 cups) sour cream, room temperature

  • 1 1/2 tsp. vanilla extract

  • 1 1/2 cups semi-sweet chocolate chips or chunks (mixed with 1 tbsp. of flour)

  • Confectioners' sugar, to finish (optional)

Directions 

  1. Preheat your oven to 350°F. Generously grease your bundt pan or loaf pans with cooking spray or butter, and coat the pan with a layer of sugar (much like you do with greasing and flouring a pan). Tap out the excess sugar.

  2. In a bowl, whisk together the flour, baking soda, and salt and set aside.

  3. In an another bowl, using your hands or a whisk, massage/mix the sugar and orange zest together until fragrant (this helps release the oils in the zest) and add to the bowl of a stand mixer fixed with the paddle attachment (or you can use a hand mixer). Add the butter, and cream together until it is light and fluffy. Scrape down the sides.

  4. Add the eggs, one at a time, making sure each one is fully incorporated before adding the next. Add the sour cream and vanilla and mix. Scrape down the sides again.

  5. Slowly add the flour mixture to the stand mixer and mix until the batter is smooth, but do not overmix. Fold in the chocolate chips or chunks with a spatula. *Reminder that the chocolate is tossed with 1 tbsp. of flour to prevent it from sinking to the bottom while baking.

  6. Pour the batter into your desired cake pan. If using a bundt pan, do not fill the cavity more than 2/3 full, to avoid the cake spilling out. If you have enough leftover batter, you can make cupcakes or even a single 6in. cake.

  7. Bake in the oven for just about 1 hour, or until a small serrated knife inserted in the center comes out clean. Allow the pan to cool for 10 minutes before turning the cake out. Dust with confectioners' sugar (if using) and enjoy!


TRES LECHES CAKE

In case you haven't looked at a calendar, watched the news, or glanced at your phone... today marks the first day of May! Normally I would feel pretty indifferent about this, but this year I'm welcoming May with open arms: next month my sister, Tianna, is getting married! To say that I am ecstatic is a complete understatement, and even though a lot of planning and coordinating must be done from now until the big day, I know it will all come out perfectly!

For the wedding, not only am I in the wedding party, but I also have been asked to make ALL the desserts, including the wedding cake (the wedding will have over 100 people). When my sister had asked me months ago to do the desserts, I was pretty hesitant (read: HORRIFIED) and was worried that I would mess something up and ruin the day. But after much thought and talking to my friends and family, I decided I would be crazy not to. Doing the desserts for a wedding will be my biggest accomplishment thus far in my baking career, and I know that after the day is over, I will feel pretty triumphant. And if I screw something up, like burning the cookies or making an uneven cake (knock on wood), life will go on and I'm sure we'll all get a good laugh out of it.

I'm not going to reveal what I'm baking just yet, but one idea I had was to make this Tres Leches cake. For dinner at the wedding, we are eating tacos with rice and beans and plenty of chips and salsa, catered by an amazing taco spot in Los Angeles (Sky's Gourmet Tacos), so I figured a Mexican/Latin American cake would work out perfectly. But alas, my sister and her fiancé decided on something more simple and easier for me to bake, so I happily obliged. 

IMG_9541.jpg

With that said, a Tres Leches cake is still a wonderful option for any type of celebration, especially considering what this Saturday is (Cinco de Mayo!!!). I personally have made it for birthday parties (including my boyfriend's 30th) and backyard BBQs and it's always a hit. For those of you who don't know, "tres leches"  translates to "three milks". This has to do with soaking the cake in a combination of sweetened condensed milk, evaporated milk, and heavy cream.  Additionally, there is whole milk baked into the cake so it's safe to assume that anyone who is lactose-intolerant should stay far away from this cake and allow the milk fans to enjoy it!

The recipe for a Tres Leches cake can be broken down into three components: 1) the baking of the cake 2) the "poke and soak" aspect that entails filling the cake with a liquid and 3) the topping. All three components are quite straightforward and shouldn't give you any trouble unless you are not familiar with beating egg whites into soft, and eventually, stiff peaks. This step is important in making a perfect texture for the cake, and so I would suggest clicking here if you need some guidance.

Lastly, you may choose to decorate the cake in whichever way you wish.  Usually, the cake slices will have a maraschino cherry on top but I also like to add a good amount of sprinkles (I got this idea via the restaurant Trois Familia in Los Angeles). Whichever way you choose, it'll still be beautiful with the fresh whipped topping.


Tres Leches Cake

Recipe adapted from Smitten Kitchen

Ingredients

  • Butter and flour for cake pan, or nonstick cooking spray

  • 1 3/4 cup all-purpose flour

  • 1/4 cup cornstarch

  • 2 tsp. baking powder

  • 1/2 tsp. kosher salt

  • 6 large eggs, whites and yolks separated, room temperature

  • 2 tsp. vanilla extract

  • 1 1/4 cup sugar

  • 1/4 cup whole milk

  • 1 12 oz. can evaporated milk

  • 1 14oz. can sweetened condensed milk

  • 1 1/2 cup heavy cream

  • 1-2 tbsp. dark rum (optional)

  • 2 cups heavy cream (this is for the whipped cream topping)

  • 2 tbsp. confectioners' or granulated sugar (for whipped cream topping)

Directions

  1. Preheat oven to 350°F. Generously butter and flour (or spray with nonstick cooking spray) a 9" by 13" baking pan and set aside.

  2. In a small bowl, whisk together flour, cornstarch, baking powder and salt.

  3. In the bowl of a stand mixer fitted with the whisk attachment (or in a large bowl if using a hand mixer), beat the egg whites on medium speed until soft peaks form. With the mixer still going, slowly add the sugar and bring the speed up to medium-high until stiff peaks form. Add the vanilla extract and mix until incorporated.

  4. To the bowl, add one egg yolk at a time, mixing thoroughly before adding another. Add the whole milk and beat until combined, followed by adding the flour mixture in three additions.

  5. Pour the batter into the baking dish and bake in the oven for 18-24 minutes (or until a toothpick inserted in the center comes out clean). Allow cake to cool completely before moving on to the next step.

  6. In a large bowl, ideally one with a spout, whisk together the evaporated milk, sweetened condensed milk, heavy cream, and rum (if using). Using a toothpick or a fork, poke holes all over the cake including the edges, and pour the liquid milk mixture on top. Refrigerate the cake for at least a couple of hours, but if time allows, refrigerate overnight. The more time the cake sits, the more time for the cake to absorb the liquid.

  7. After refrigerating, make the whipped cream topping. In the bowl of a stand mixer using the whisk attachment, beat together the heavy cream (2 cups) and sugar (2 tbsp.) until soft peaks form. Spread evenly over the cake, top with maraschino cherries and/or sprinkles, and enjoy!